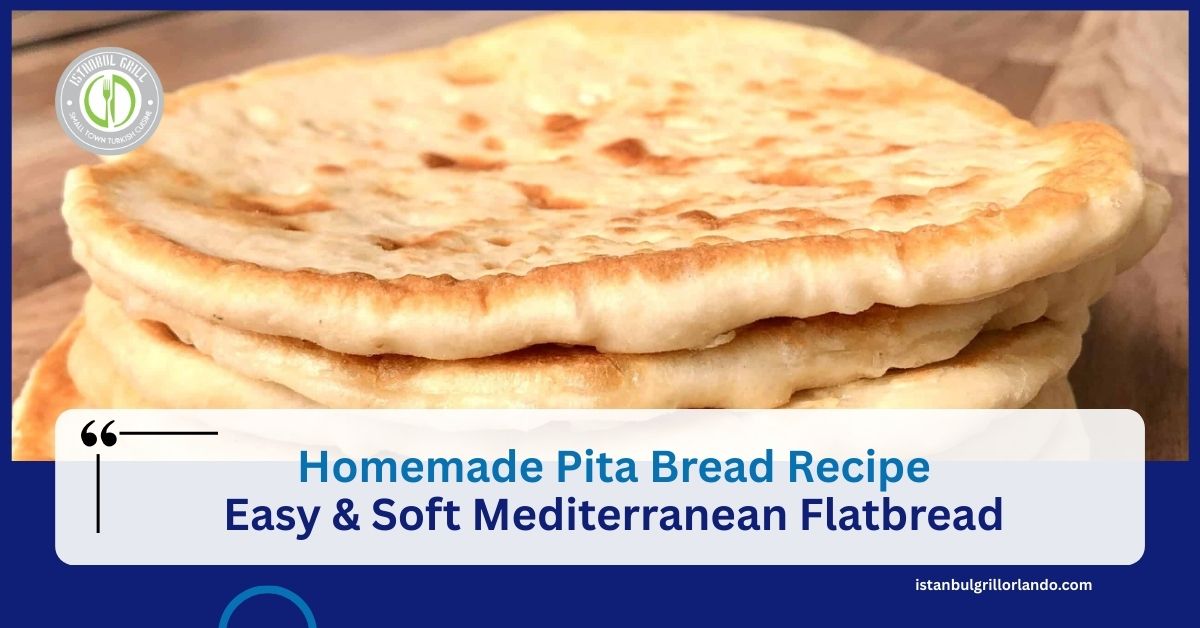
There’s nothing quite like the smell of fresh pita bread baking in your kitchen. At Istanbul Grill Restaurant, we’ve been making pita bread the traditional Mediterranean way for years, and today we’re sharing our foolproof recipe with you.
Making pita bread at home is easier than you think. You don’t need fancy equipment or hard-to-find ingredients. Just basic pantry staples, a hot oven, and about 90 minutes from start to finish. The result? Soft, pillowy pitas with that perfect pocket for stuffing with your favorite fillings.
Whether you’re planning a Mediterranean feast, looking for the perfect vessel for your homemade hummus and falafel, or just want fresh bread that puts store-bought to shame, this recipe delivers every single time.
Why You’ll Love This Homemade Pita Bread
- It’s actually simple. No complicated techniques or professional baker skills needed. Just mix, rest, roll, and bake.
- It puffs up beautifully. There’s something magical about watching pitas balloon in the oven. That pocket forms naturally when you follow our tips.
- It tastes incredible. Warm, soft, and slightly chewy with a delicate flavor that makes everything you wrap in it taste better.
- It’s healthier. You control what goes in. No preservatives, no weird additives, just real ingredients.
- It freezes perfectly. Make a big batch and have fresh pita ready whenever you need it.
Ingredients for Homemade Pita Bread
Here’s what you need to make 8 soft, fluffy pitas:
For the Dough:
- 3 cups all-purpose flour (plus extra for dusting)
- 1 tablespoon active dry yeast
- 1 tablespoon sugar
- 1 teaspoon salt
- 2 tablespoons olive oil
- 1 cup warm water (110°F)
That’s it. Six simple ingredients you probably already have in your kitchen.
How to Make Perfect Pita Bread (5 Easy Steps)
Step 1: Make the Dough
In a large mixing bowl, combine the warm water, sugar, and yeast. Stir gently and let it sit for 5 minutes until it gets foamy. This means your yeast is alive and ready to work.
Add the flour, salt, and olive oil to the bowl. Mix everything together until a shaggy dough forms. Then turn it out onto a floured surface and knead for about 5-7 minutes. You want the dough smooth and elastic, not sticky. If it’s too sticky, add a little more flour, one tablespoon at a time.
Step 2: Let the Dough Rise
Place your dough in a lightly oiled bowl and turn it to coat all sides. Cover the bowl with a clean kitchen towel or plastic wrap. Let it rise in a warm spot for about 1 hour, or until it doubles in size.
Pro tip from our Istanbul Grill kitchen: Turn your oven on to the lowest setting for just 1 minute, then turn it off. Place your covered bowl inside the warm (not hot) oven. It creates the perfect rising environment.
Step 3: Divide and Shape
Once your dough has doubled, punch it down gently to release the air. Turn it out onto your work surface and divide it into 8 equal pieces. Roll each piece into a smooth ball.
Cover the balls with a damp towel and let them rest for 10 minutes. This resting time makes rolling much easier because the gluten relaxes.
Step 4: Roll Out the Pitas
Preheat your oven to 475°F. If you have a pizza stone or baking steel, put it in the oven to heat up. If not, flip a baking sheet upside down and preheat that.
On a lightly floured surface, roll each ball into a circle about 6-7 inches wide and roughly ¼ inch thick. Try to keep the thickness even so they puff up properly. Don’t roll them too thin or they won’t form pockets.
Step 5: Bake to Perfection
Place 2-3 pitas directly on your preheated baking surface (don’t let them touch). Bake for 3-5 minutes until they puff up like balloons and just start to get light golden spots on top.
Remove them immediately and wrap in a clean kitchen towel. This keeps them soft and prevents them from getting crusty. Repeat with remaining dough.
Important: The key to pockets is HIGH HEAT and a HOT baking surface. Don’t skip the preheating.
Tips for the Best Pita Bread Every Time
- Water temperature matters. Too hot and you’ll kill the yeast. Too cold and it won’t activate. Aim for 110°F, which feels warm but not hot on your wrist.
- Don’t skip the kneading. This develops the gluten that gives pitas their chewy texture and helps them puff up.
- Even thickness is crucial. If your pitas are thicker in the middle than on the edges, they won’t puff evenly. Keep your rolling pin moving and flip the dough as you roll.
- Work fast once they’re rolled. Don’t let rolled pitas sit too long before baking or they can dry out.
- Bake on the bottom rack. The intense bottom heat is what creates steam inside the dough and makes it puff.
- Keep them wrapped. As soon as pitas come out of the oven, stack them in a towel. The steam keeps them soft and pliable.
How to Store and Reheat Pita Bread
At room temperature: Keep pitas in an airtight container or zip-top bag for up to 2 days. They stay soft and ready to use.
In the refrigerator: Store for up to 1 week in a sealed bag. They might firm up slightly but will soften when reheated.
In the freezer: This is our favorite method for meal prep. Let pitas cool completely, then stack them with parchment paper between each one. Place in a freezer bag and freeze for up to 3 months.
To reheat: Wrap pitas in a damp paper towel and microwave for 15-20 seconds. Or warm them directly over a gas flame for 10 seconds per side for that fresh-baked taste. You can also wrap them in foil and warm in a 350°F oven for 5-10 minutes.
Ways to Use Your Homemade Pita Bread
The possibilities are endless, but here are our favorites at Istanbul Grill:
- Stuff them: Fill pockets with falafel, grilled chicken, shawarma, gyros, or your favorite protein plus fresh veggies and tahini sauce.
- Dip them: Cut into triangles and serve with hummus, baba ganoush, tzatziki, or any Mediterranean dip.
- Make pizza: Top with sauce, cheese, and toppings for quick personal pizzas.
- Breakfast wraps: Fill with scrambled eggs, cheese, and vegetables for a satisfying morning meal.
- Sandwich base: Use them instead of regular bread for any sandwich. They hold up better and taste amazing.
- Chips: Cut into wedges, brush with olive oil, sprinkle with za’atar or garlic salt, and bake until crispy.
Common Mistakes and How to Fix Them
Mistake 1: Pitas don’t puff up
This usually happens when the oven isn’t hot enough or the baking surface isn’t preheated. Make sure your oven reaches 475°F and give your baking stone or sheet at least 20 minutes to heat through. Also check that your pitas are about ¼ inch thick—too thin and they won’t puff.
Mistake 2: Dough is too sticky to work with
Different flours absorb water differently. If your dough feels wet and sticky after kneading, add flour one tablespoon at a time until it’s smooth and slightly tacky but not sticky. The dough should pull away from the bowl.
Mistake 3: Pitas turn out tough and chewy
Overkneading or too much flour can make pitas tough. Knead just until smooth and elastic (about 5-7 minutes). Also make sure you’re not rolling them out too thin. They need some thickness to stay soft.
Mistake 4: Pitas are dry and crumbly
This happens when they’re overbaked or not stored properly. Bake just until puffed with light golden spots—usually 3-5 minutes. As soon as they come out, wrap them in a towel to trap steam and keep them moist.
Mistake 5: Yeast doesn’t foam
Your water might be too hot or too cold, or your yeast might be expired. Water should be around 110°F (warm but comfortable to touch). Check your yeast’s expiration date and make sure it’s stored properly.
The Science Behind the Puff
Ever wonder why pitas magically inflate in the oven? Here’s what happens: When you place rolled dough in a very hot oven, the outside starts to set quickly while the inside is still moist. The water in the dough turns to steam, and that steam needs somewhere to go. Since the outer layer has already started to firm up, the steam pushes up the top layer and down the bottom layer, creating that perfect pocket in the middle.
This is why temperature and thickness matter so much. Too cool and the dough bakes slowly without creating enough steam pressure. Too thin and the dough sets completely before steam can build up. Too thick and the heat can’t penetrate fast enough. When everything’s just right, you get that satisfying balloon effect.
Making Pita Bread for a Crowd
Planning a party? Here’s how much you’ll need:
For 10 people: Make a double batch (16 pitas). Most people will eat 1-2 pitas depending on what else you’re serving.
For 20 people: Make a triple batch (24 pitas). You’ll have a few extras, which is always better than running out.
For 50 people: Make 6 batches (48 pitas) or plan on 1 pita per person as a conservative estimate.
Pro tip: Pitas are actually better made a day ahead for large gatherings. They’re easier to handle when not piping hot, and you can focus on other prep the day of your event. Just store them properly and reheat right before serving.
Why Homemade Beats Store-Bought Every Time
We serve thousands of pitas every month at Istanbul Grill Restaurant, and we’re often asked why we don’t just buy them. Here’s why homemade is worth it:
- Freshness you can taste. Store-bought pitas can be days or weeks old. Yours are hot from the oven.
- Better texture. Commercial pitas often have preservatives that change the texture. Yours are naturally soft and pillowy.
- No weird ingredients. You know exactly what’s in your pitas. Many store brands add dough conditioners, preservatives, and other additives.
- They actually have pockets. Many store-bought pitas barely separate, making them hard to stuff. Yours have real pockets because they’re baked properly.
- More economical. A batch of 8 pitas costs less than $2 to make. Store-bought packages cost $3-5 and only have 6-8 pitas.
- The satisfaction factor. There’s something special about serving bread you made yourself. Your family and guests will be impressed.
Final Thoughts from Istanbul Grill
Making pita bread at home transforms ordinary meals into something special. Whether you’re recreating your favorite Mediterranean dishes or just want better bread for sandwiches, this recipe delivers consistent, delicious results.
The process might seem involved the first time, but after making them once or twice, you’ll find your rhythm. Many of our restaurant staff can now make perfect pitas with their eyes closed—and you’ll get there too.
Start with this basic recipe, master it, and then feel free to experiment. Add herbs to the dough, brush with garlic butter right out of the oven, or sprinkle with seeds before baking. The possibilities are endless.
We’d love to hear how your pitas turn out! Have you tried this recipe? What did you fill yours with? Any questions we didn’t answer? Drop a comment below and share your experience. At Istanbul Grill, we believe good food brings people together—and homemade pita bread is the perfect place to start.
Ready to start baking? Gather your ingredients, preheat that oven, and get ready to impress yourself with the easiest, most satisfying homemade bread you’ll ever make.